Total Pageviews

Showing posts with label Stampoholic Nano. Show all posts

Thursday, 9 March 2017

Cards using DCAM dies

Hello friends,
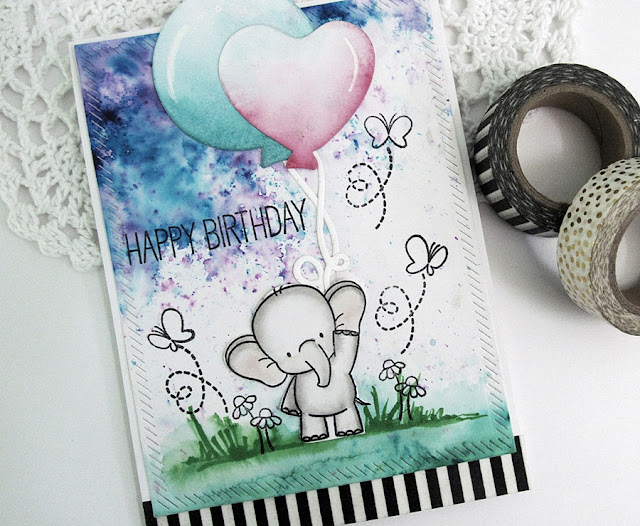
 Today i have two cards to share using DCAM dies.First one is using the newest release "Balloon dies".I created the background using color burst,then stamped the background images using stampoholic nano.The elephant image is stamped separately and colored using zig markers.The balloons are colored using distress inks.


For the second card i created the background using "YOU" die cut from "Blessed/ings/you" die cuts.Stamped several flowers and leaves using stampoholic nano,and  colored them using zig markers.


Products used:


Thank you for stopping by,
kavi

The website is updated with a new look and is ready to take orders from USA, Canada, Guam, Mexico, Australia and New Zealand, all other countries will be added soon. 
Thank you so much for playing along with us and have a great day. Please follow DCAM and the team on various social media platforms. 

Monday, 13 February 2017

Inverted scalloped die

Hello friends,
Gayatri here.
Today I am back with more inspirational projects using the Inverted Scalloped Rectangle dies.

For the first card I have used the smallest die. I layered it with pattern papers. I adhered them to the card base. I added few handmade flowers to complete the card. The sentiment is from Altenew.


The second card I used the  Stripes Weave Basket background die to create the background. I added the image on one corner. I stamped the image again and colored and fussy cut the flowers. I slightly shaped them and adhered them to give dimension. For the sentiment I used the negative part of the scalloped rectangle die cut. added few sequins to finish the card.


Products used:

Inverted Scallop Rectangle 


Stripes Basket Weave  
Altenew


Stampoholic Nano
Zig color brush pens
Hope you liked my creations. Do follow us on these social sites too


The website is updated with a new look and is ready to take orders from USA, Canada, Guam, Mexico, Australia and New Zealand, all other countries will be added soon.

Saturday, 11 February 2017

Hello There - Its a Girl

Hello friends, Piyanki here today with some fun, beautiful projects. I have used an assorted die collection from DCAM along with other products.

The first project is a set of envelope and tag. The Envelope Die was released last month and we have already seen such wonderful projects with the. The Tag die I feel is very versatile and this is how I have used it.


I have used the Wine Tag die and cut the top portion so that it can be used as a TAG only. Took a pattern paper and used Baby theme stamps to create the background.

Used the Double Stitched Square  to create the frame on which I have embellished with flowers and sentiments.


Because I wanted to make a set, I used the same self background paper. Again used the Double Stitched square die  and the Envelope Die to add the second layer of the background.


This is how the set looks together. Used the " Its a Girl" Die to add the sentiment.

My next project is a little cute one and I had fun making it.


I have used the Inverted Scallop Square on which I have added some pattern using Box Maze Stencil.  On the background I have created the pattern using Floral Delight Stencil.


Thanks for Stopping by !
Do share how you like it and below listed are the products I have used.

DCAM Product Supplies

http://diecutsandmore.com/product/box-maze-two-step-stencils/
http://diecutsandmore.com/product/floral-delight-two-step-stencils-2/
http://diecutsandmore.com/product/double-stitched-square-dies/

http://diecutsandmore.com/product/inverted-scallop-square-frame-dies/

http://diecutsandmore.com/product/stampoholic-nano/

http://diecutsandmore.com/product/envelope-die/     
http://diecutsandmore.com/product/wine-tag-die/
          
http://diecutsandmore.com/product/independence-day-mix/
http://diecutsandmore.com/product/its-a-boy-girl-word-die/


You can find us:

Blog | You Tube | Facebook | Instagram | Twitter


Friday, 27 January 2017

Sending love...

Hello everyone!

Gayatri here, back with another set of inspiration with the latest dies released by DCAM. I am showcasing the Inverted Scallop Rectangle Frame dies and sentiment dies today.

1. Best Wishes


I cut a frame with the largest of the dies. I cut in half and layered it on a pattern paper.I inked the edges of the pattern paper with vintage photo DI. I added a handmade flower and few leaf die cuts. I die cut the sentiment on a black CS and adhered the same. The whole layout I layered on a white card stock.

2. Sending Love


  • For this card I used the second largest die and die cut a frame from white CS.
  • I cut a white card stock with one of the dies from the Double stitched border and Card creator die set. I inked it with Mowed lawn DI.
  • I tool a white card base and inked it with Ocean waves ink from Altenew.
  • I inked through Tim Holtz stencil - 'Rays' with Wild honey DI. I adhere the stitched border die cut, to the card base. 
  • I adhere the frame with foam tape.


  •  I added the image - stamped with Nano and colored with copics. 
  • I stamped the sentiment and added two heart sequins.


Products used 

Script die  

\


Inverted Scallop Dies

Double stitched dies  


Nano  


Sweet Heart Mix

Hope you liked my projects. Till next time - Happy crafting!!

The website is updated with a new look and is ready to take orders from USA, Canada, Guam, Mexico, Australia and New Zealand, all other countries will be added soon. 


Please follow us on these social sites too


Sunday, 10 July 2016

Episode -5 Create your own Background w/STAMPOHOLIC

This week I have a super cute Flamingo card to share with you. I created my own background using my Stampoholic tool and a linear stamp. All you need to do is stamp one image, move your paper the width of your stamp and stamp again, you can fill an entire page or just stamp a highlight like I did. I also added some water droplets to make the distress ink move around on the background.


And not to leave out my Stampoholic Nano I used it to stamp the sentiment on my card front and the Flamingo too!


Check out the video to see the full process and instructions. All stamps used for the flamingo and sentiments are from Your Next Stamp.


Hope you enjoy the video and get inspired to make many great projects. But before you go Die Cuts and More is having a give away, at the end of this 6 Video series there will be a draw and you can win a Stampoholic Nano of your very own. Please see the rules below.

Stampoholic Nano Giveaway
1. Must be a subscriber to Die Cuts and More on YouTube.
2. Must be a subscriber to ME on YouTube.
3. Join the Stampoholic Fans Facebook Group and Like the Stampoholic Shop on Facebook.
4. Leave a comment on the Die Cuts and More blog for Episode 1.

Good Luck and Happy Papercrafting!