Total Pageviews

Saturday, 11 March 2017

DCAM Alpha Dies

Hello my dear friends, Piyanki here today with 2 fun, cute cards. I am largely using the Bold Alpha die which was released months back.

Considering the versatility of the die it makes me go back to this set again and again.


For this card I used the So Suzy Turtle Stamp and stamped it with Black on the white background. Later die cut the word YOU using the DCAM Bold Alpha. Colored  the turtle using distress water coloring. Also used a white pen to add the stitched lines to the word. The card is sized to 3.5 X 7 inches.

My second card also size the same. I used the Envelope Die for the first layer where I have stamped it for the background. Later Die cut the word hello from BOLD Alpha Die and the word Naughty. I have adhered multiple layers to have a 3D effect. The coloring is again water coloring with distress ink.
Do share how you like the product and also share your love and comments.
Listing down all the products used.


Envelope Die


Bold Alpha


Naughty


Thursday, 9 March 2017

Cards using DCAM dies

Hello friends,
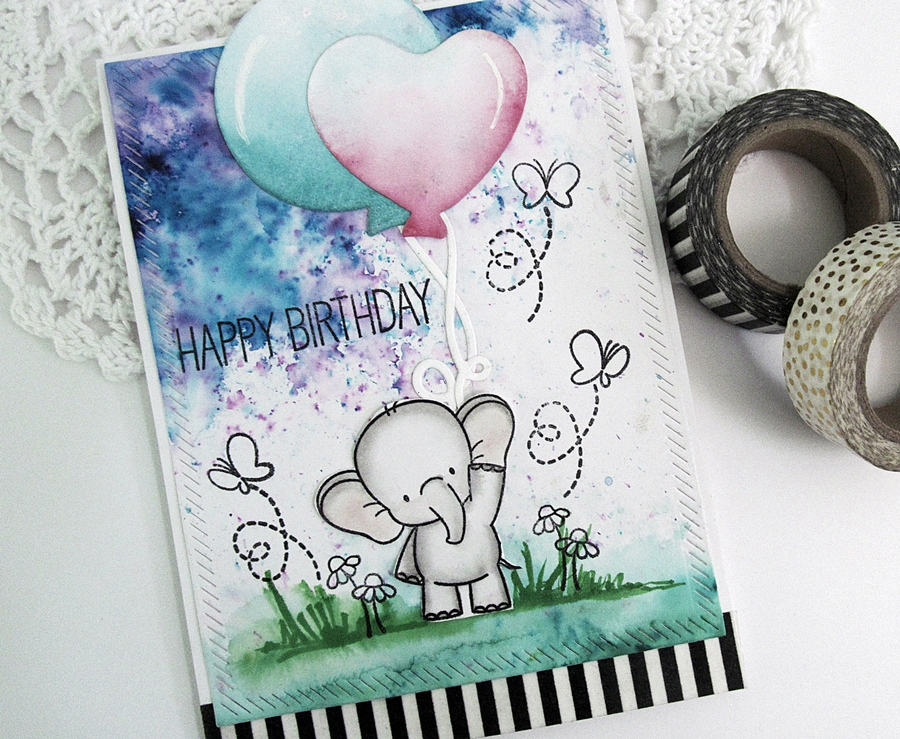
 Today i have two cards to share using DCAM dies.First one is using the newest release "Balloon dies".I created the background using color burst,then stamped the background images using stampoholic nano.The elephant image is stamped separately and colored using zig markers.The balloons are colored using distress inks.


For the second card i created the background using "YOU" die cut from "Blessed/ings/you" die cuts.Stamped several flowers and leaves using stampoholic nano,and  colored them using zig markers.


Products used:


Thank you for stopping by,
kavi

The website is updated with a new look and is ready to take orders from USA, Canada, Guam, Mexico, Australia and New Zealand, all other countries will be added soon. 
Thank you so much for playing along with us and have a great day. Please follow DCAM and the team on various social media platforms. 

Wednesday, 1 March 2017

DCAM HAPPY BALLOONS


Greetings DCAM friends and fellow crafters. Happy March, can you believe this year is flying by so fast, already in our 3rd month. Today I am bringing you a couple of cards I made using the

Balloon die set released in February from DCAM. I fell in love with this die set the minute I saw it and knew what I was going to be working on with it.
Balloons Die

So, here it goes...

You will see the both of my projects are birthday cards. It worked out well that I had this die to work with, as my mother in law needed a couple of birthday cards to send out this week.


For my first card, I used the Balloon, Border and Celebrate Dies to create the front. I ran the Balloon die through my Big Shot 3 times, once for each color used. This gave me a full set of each Balloon shape to have fun with. I had also run it through in white, however, I did not like the white on white background so saved it for my second project. I then carefully laid out the cuts so that I did not have the same color touching when set. The paper used was adhesive backed, so that made it really easy for sticking it down. The Celebrate saying I used a zig glue pen to adhere it down.

Let me say, it was fun using these birds again. I have had them in my stash pretty much since they first came out and have only used them a few times, this card just screamed for it. Remember I said above that I used the white balloons on my second project... well this is what I did, using my Stampoholic I stamped two of the birds on the balloons. I then used my Zig Clean Color Real Brush Markers to color the birds. The great thing about this Balloon set is if you notice there is a hollow balloon, well that one matches up to the balloon two over to the left, I was so happy to realize this, as I used the hollow to make the top layer. I used a light dusting of Salty Ocean distress ink for the background on the two balloons.
The piece I have the "Happy Birthday" sentiment stamped on is made using the long balloon in the top row of the set, and the red and blue end pieces were made using the bottom long balloon ends.

I really had a lot of fun making these cards, and I hope you enjoyed them as well.

Items from DCAM used in these projects:


Balloon Die

Celebrate Die


Double Stitched Border Card Shaper
download-5
Salty Ocean Mini

Please follow DCAM and the team on various social media platforms.


The website is updated with a new look and is ready to take orders from USA, Canada, Guam, Mexico, Australia and New Zealand, all other countries will be added soon. 

Tuesday, 28 February 2017

Tags made with Inverted Scallop Square Frame Die

Hello Dear Friends,


Shalini Pahwa here, today i would like to  share some work using inverted scallop square frame die, and i'm using it as a tag embellishment for gift boxes, message holder, in scapbook/layout, mini album or anything according to your requirements.

 I have created four different tags with different sentiments and different stamp fussy cutz with sequins and twine tied on the top.


DCAM Products Used:


I hope you all will like my work
and would love to hear your words.

Have A Nice Day!!!

Please follow DCAM and the team on various social media platforms.


The website is updated with a new look and is ready to take orders from USA, Canada, Guam, Mexico, Australia and New Zealand, all other countries will be added soon. 

Monday, 27 February 2017

Mixed Media Tags

Hello friends,

Today I want to share two tags I made using the Cross Hatch die released in February. It is a perfect die to create back ground or add texture. When I received this die my first impulse was to try texture for Mixed media.

1.

I took many die cuts with the die and stuck few of them together for more depth. I took a water color paper and trimmed it to 6 x 3.5 inches. I stuck the die cuts and gave a coat of white gesso. I prepared the back ground using various sprays and colors. I stamped using Grunge effects stamps with Black Archival ink. I took a leaf mdf cut out and coated it with gesso. I colored that also with the colors used for the background. I added few handmade flowers and sequins and the sentiment.


2.

I took another piece of watercolor paper with the same measurement as the above. I coated it with black gesso and colored it with Art Alchemy acrylic paints. You can see the metallic sheen in the colors. I added the die cuts and made a few splashes with white gesso. I added few layers with doily, cheesecloth and lace. I added few hand made flowers and finished with sequins and sentiment.


 Here is a picture of both the tags.


Products used:

Crass Hatch Die
Frozen Mix 


Purple Passion Mix
Archival Ink

Hope you liked my projects and inspired you to try out the amazing die release.

Till next time - Happy crafting
Gayatri

The website is updated with a new look and is ready to take orders from USA, Canada, Guam, Mexico, Australia and New Zealand, all other countries will be added soon. 

 Do follow us on other social media also:


Saturday, 25 February 2017

Bold XL Number Die - Celebration

Hello my dear friends, Piyanki here today with some fun, easy projects using the newly released Number Die.

Now Number, alphabets are something we would need it almost every time in most of our project. DCAM has the complete range and you dont have to look here and there.

The Dies are  sturdy and gives a clean cut and you see the complete range HERE.

Now today I have 3 cards to share.


How to : Cut a 5,5 x 4.25 from a White CS. Take out all your small stamps that you have and random stamp on the layer. Use the Border stitch die and die cut twice to create a single layer. Later die cut multiple XL Number Die to create the Birthday year. End it with a sentiment.


How to: Cut a 5.5" X 4.25" from a Black CS. Use a 3" X 4" and use some multi color jute twines and create the background. End one layer uneven. Die Cut multiple pieces of Bold XL Number die and stack together to create the dimension. Die cut a border and layer the number along with a sentiment,

The third card is a little different from the top 2 .


How To : Cut a 5.5" X 5.5" white CS. Cut another CS and dry emboss it. Cut a Banner from a CS and layer it with Bold XL number die with the tone on tone color. Die cut the number 25 from a silver paper and then stack multiple layers. End it with a sentiment.

Thanks for stopping by and do share how you like it. I am listing down the products I have used.


You can find us here
Blog | Twitter | You Tube | Facebook